Setting a notification channel
Setting a notification channel enables you to receive data from devices to the application of your choice.
When you set a notification channel, and when you subscribe to a resource or send the device a command, you provide your application's access key. Device Management knows which device data to send to which notification channel based on this application key.
You can register a callback URL or a WebSocket as your notification channel.
Device Management delivers notifications in batches of up to 20,000 items. When you use callback channels, the web application should respond quickly because the next batch of notifications is accumulating in the queue during the delivery of the current batch. When you use websockets, Device Management keeps pushing batches of notifications as they arrive from devices until the websocket is closed or an error occurs in the connection.
Note: When you upgrade from a free tier to a commercial tier account, Device Management does not update notification channels automatically. The limits listed on Account types and limits page apply until you delete your channels and register them again. You can use the same access key when re-registering the notification channel.
Properties
| Property | Limit | Description |
|---|---|---|
| Queue size | 50 MB | The queue for one access key channel is limited to 50MB. A reliable storage has some overhead for every stored notification. As an example, an event of 100 bytes can have more than 160,000 messages in the queue before the oldest ones are deleted. If the queue size limit is exceeded, the oldest events in the queue are removed to stay within the limited size. |
| Event lifetime | 24 hours | Events Device Management has received more than 24 hours ago will be removed from the queue. You can use the event timestamp to see how old items there are in the queue and whether your system is keeping up with the event speed. |
| Channel idle timeout | 48 hours | If there is no data coming in within 48 hours, the queue is removed. You will need to establish a new channel to start receiving events. |
| Delivery fail timeout | 24 hours | Device Management tries to deliver events for 24 hours. If the remote end does not respond during that time, the channel is deleted. |
| Batch size limit | 10,000 events (default) | Even one event in the queue triggers notification sending. The events come in batches of 50-20,000 depending on the number of events in the queue. You can adjust this with the max_chunk_size configuration. |
| Events in a second | ~ 1000 events in a second | Notification channels can receive and deliver at least 1000 events in a second. Network conditions and, in the case of callback channels, delayed response to the delivery request may affect the delivery rate. |
| Event sending retry limit | Commercial - no limits Free-tier - limits apply |
For a commercial account, event resending is not limited. The event lifetime and queue size apply. For free-tier accounts, the retry limitations for a callback channel is - Sending is limited to one. If sending fails, the next batch is sent. |
If you need higher limits, please contact sales.
Note: Every notification channel is bound to the access key of an application. If two different application instances use the same access key, the application that sets the channel last overrides the previous one.
Setting up callback notifications
Registering a callback notification channel
To set up a callback notification channel:
-
Register the callback URL using the /v2/notification/callback PUT API.
You can also use
/v2/notification/callbackto define optional headers. For example, you can set an authorization header with a token, or provide additional information to your web application. -
Integrate the Device Management CA into your application to enable the application to authenticate communication with the Device Management.
For the application to validate the Device Management certificate, you need to add the chain of trust from the GlobalSign root certificate to the application server:
-
- Subject: OU=GlobalSign Root CA - R3, O=GlobalSign, CN=GlobalSign
- SHA1 fingerprint: D6:9B:56:11:48:F0:1C:77:C5:45:78:C1:09:26:DF:5B:85:69:76:AD
-
GlobalSign Organization Validation CA - SHA256 - G2
- Subject: C=BE, O=GlobalSign nv-sa, CN=GlobalSign Organization Validation CA - SHA256 - G2
- SHA1 fingerprint: EF:90:B2:B8:6F:47:56:EB:E7:D3:6F:F3:01:5D:63:52:3A:00:76:E9
-
The Device Management server CA.
-
Note: You need to set the verification depth of the client certificates chain to 2 at least.
Device Management presents a certificate signed by a trusted certificate authority (GlobalSign) with a Common Name (CN) set to notifications.mbedcloud.com when Device Management sends a request to the callback URL. Your application can also validate the certificate common name.
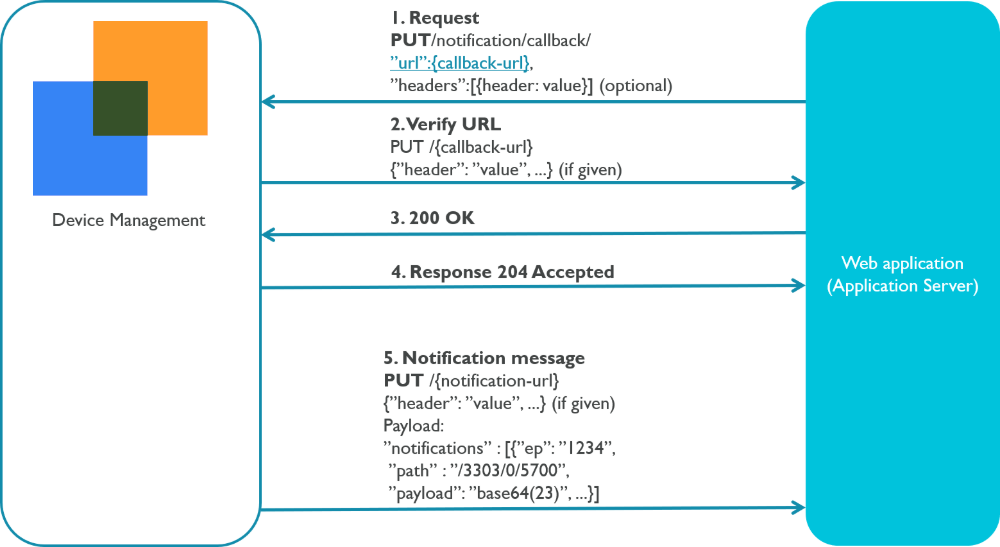
Integrating an application with Device Management for callback notifications
This diagrams shows the communication between Device Management and the application server during the callback notification flow:
-
The web application calls PUT /v2/notification/callback and provides the callback URL in the body.
Note: The callback URL in the web application must be publicly available to be accessed by Device Management.
-
Device Management verifies the callback URL by placing a PUT call with the given headers (headers are optional).
-
The web application responds with
200 OK. -
Device Management stores the callback URL for the specific access key.
Note: Each access key can only have one callback URL. If you set another callback URL with the same access key, the first URL will be overwritten.
-
When an event occurs, Device Management sends notification messages to the callback URL, with the given headers.
Note: If sending to the callback URL fails continuously for 24 hours, the callback channel is removed.
Retry mechanism using callbacks
If your web service or data sink is not available when Izuma Device Management tries to deliver a batch of notifications to a callback channel, Izuma Device Management waits and tries again.
One of two behaviors can cause this:
- Izuma Device Management receives a response other than 200 or 204 from your system.
- The request times out after 20s.
After one of these initial behaviors, Izuma Device Management waits 1s and then retries. For each subsequent unsuccessful retry attempt, the wait time until the next attempt doubles. The wait time between retries continues doubling until it reaches the maximum retry wait of 120s. After that, Izuma Device Management continues to try to send the batch in 120-second intervals:
| Retry attempt | Time since previous retry attempt | Time since initial behavior |
|---|---|---|
| 1 | N/A | 1s |
| 2 | 2s | 3s |
| 3 | 4s | 7s |
| 4 | 8s | 15s |
| 5 | 16s | 31s |
| 6 | 32s | 63s |
| 7 | 64s | 127s |
| 8 | 120s | 247s |
| 9 | 120s | 367s |
| 10 | 120s | 487s |
The number of notification retry attempts may be limited, depending on your account type:
| Account type | Channel type | Limits |
|---|---|---|
| Commercial | Callback | None |
| Free-tier | Callback | Limited to 1. If the notification batch sending fails, the next batch is sent. |
Setting up WebSocket notifications
Registering a WebSocket notification channel
To set up a WebSocket notification channel:
-
Use the /v2/notification/websocket PUT API to register a WebSocket notification channel.
Note: A single WebSocket channel can deliver a few thousand events per second.
The notification channel begins receiving subscribed events immediately. However, the application only receives the event bundle after the application opens the socket.
-
Use the /v2/notification/websocket-connect GET API to open the socket and get notifications.
Integrating an application with Device Management for WebSocket notifications
This diagrams shows the communication between Device Management and the application server during the WebSocket notification flow:
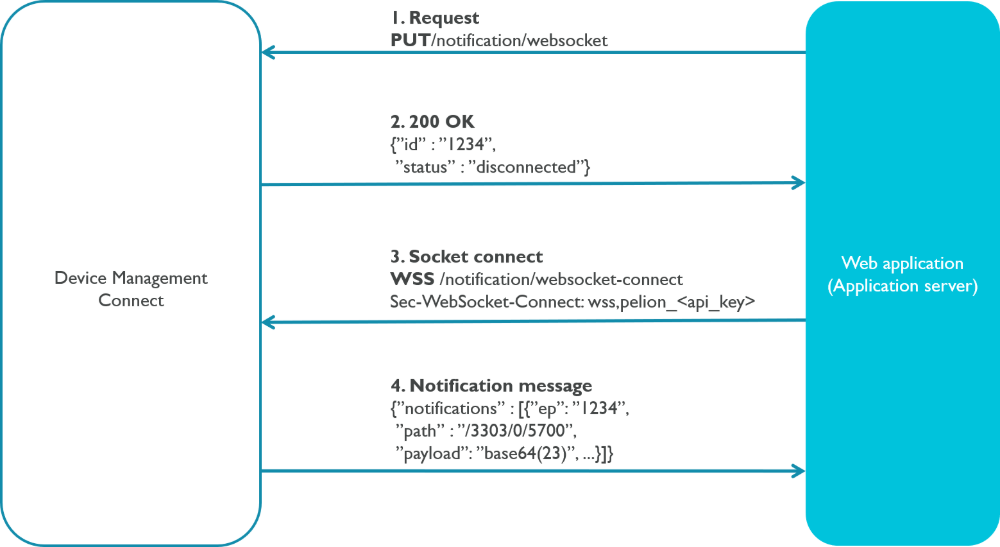
- The web application calls PUT /v2/notification/websocket to create the channel.
- The notification channel begins receiving subscribed events immediately when the application registers the channel. Device Management delivers the event bundle when the application opens the socket.
- If the WebSocket is closed but the channel is registered, the channel continues to receive and store messages until the WebSocket is connected again or for 24 hours, after which Device Management removes the socket.
- When you open the channel, its status is
disconnected. The status changes toconnectedwhenever the channel has an active WebSocket bound to it.
- The web application calls GET /v2/notification/websocket-connect.
The web application must provide the access key used in the previous step, in the
Sec-WebSocket-Protocolheader, or as a bearer token in the Authorization header if the WebSocket client supports it. - Device Management verifies the access key and accepts the WebSocket, returning a
101 Switching ProtocolsHTTP status (most WebSocket libraries handle this handshake transparently). - Device Management pushes notification events to the socket until the client or server closes it. The server closes the socket automatically after 24 hours of inactivity, or if an error occurs. Closing the socket from the client closes the channel, too.
Note: Device Management will ping your web service to keep the connection open. Most clients can handle the pings automatically. If the ping frame is not responded within a few seconds, the connection is considered lost and the server attempts closing the WebSocket with code 1001 (Going away), including a message about the ping timeout. The ping frame from the server consists of four bytes which the server expects the client to echo in the response frame ('pong').
This is an example of how to connect to the WebSocket channel using the HTML5 WebSocket API from a browser:
var socket = new WebSocket("wss://<HOST>/v2/notification/websocket-connect", ["wss", "pelion_{API_KEY}"]);

socket.onopen = function(event) {
  console.log("WebSocket opened");
};

socket.onmessage = function(event) {
  console.log("Notification received: " + event.data);
};

socket.onerror = function(err) {
  console.log("Error occurred");
};

socket.onclose = function(event) {
  console.log("WebSocket closed");
};
Configuring the channel
You can configure the channel according to your needs. For example, you can use the device's endpoint name instead of the device ID for the events. Read more about device identity.
For the channel configuration options, see v2/notification/callback and v2/notification/websocket.
Queueing
Note: If notifications come in to the Izuma Device Management cloud very close to each other, we don't guarantee they'll reach the web service in the order they were sent. The device's connections are handled in a multinode environment, so latencies differ depending on the node processing the event.
To monitor the queue size and determine whether events are expiring in the queue, monitor the event time stamps. By comparing the notification's time stamp to the current time, you know how long items have been in the queue. If the time span starts to grow, it indicates your system is not consuming events quickly enough.
Izuma Device Management stores incoming notifications to a queue if either:
- The callback URL is not responding or responds with something other than 200 or 204.
- The websocket is not connected.
After Izuma Device Management can successfully deliver notifications to your system, the queue is drained in first-in, first-out fashion.
For more information, please see the Notifications API reference.