Connect a Raspberry Pi 3 B
Securely connect a Raspberry Pi 3 to Device Management over an Ethernet connection. The Raspberry Pi 3 board runs a custom Linux image, built using Yocto branch Sumo (Yocto version 2.5). This is a small Linux image that contains the tools and libraries needed to run Device Management Client. You can update it using the Update client. The image boots directly into the Device Management Client executable.
Requirements
- A Raspberry Pi 3 Model B or 3B+ board. You need to connect the board to the internet using an Ethernet connection. (The built-in Wi-Fi interface on the Raspberry Pi 3 is not supported).
- A serial port adapter connected to the Raspberry Pi 3.
- A PC running a suitable Linux distribution to build the Raspberry Pi 3 image. See the list of supported Linux distributions. This tutorial assumes that your PC is running a 64-bit Ubuntu 16.04 LTS distribution. If you have a different distribution, please check your Linux enviroment setup details in the Yocto documentation.
- The packages required to build Yocto.
For all other requirements, see the tools and account section.
Note: Always use the SSH keys without a passphrase. Using the passphrase makes the mbed deploy command fail.
Dependencies
With Ubuntu, you can install the requirements as:
$ apt-get install -y \
gawk wget git-core diffstat unzip texinfo gcc-multilib \
build-essential chrpath socat libsdl1.2-dev xterm cpio \
cmake git python-pip whois ninja-build
$ pip install click requests
Downloading the developer certificates
Before building, download your developer certificates from the Device Management Portal:
- Log in to the portal.
- Go to Device identity > Certificates.
- Click New certificate.
- Add a name and an optional description for the certificate, then click Create certificate.
- Go to Device identity > Certificates again.
- Click on your new certificate.
- Click Download Developer C file to download the file
mbed_cloud_dev_credentials.c.
Building the Yocto image
-
Open the terminal.
-
Create cache directories for quicker builds (Optional):
sudo mkdir /var/cache/bitbake sudo chown <build-username>:<build-username> /var/cache/bitbake Then compile the SW with additional flag 'EXTRA_CONF_FILE=1' to enable consecutive builds to be quicker. -
Import the top level Yocto repository and install its dependencies:
git clone https://github.com/ARMmbed/mbed-cloud-client-yocto-setup cd mbed-cloud-client-yocto-setup mbed deploy -
Export the absolute path to your
mbed_cloud_dev_credentials.cfile in the environment:export MBED_CLOUD_IDENTITY_CERT_FILE_IMPORT=/absolute/path/to/credentials/file -
Build the Yocto image:
make -f Makefile.example build-raspberry-exampleor with cache enabled:
make -f Makefile.example EXTRA_CONF_FILE=1 build-raspberry-example
Note: The Yocto build process normally takes a lot of time and resources (disk space and RAM). Depending on the configuration of your PC, the first build might take a few hours to complete. Subsequent builds will be much faster. Using the bitbake caches as described above significantly speeds up the build process.
(Optional) Firmware update
-
Generate the update certificate file and keys:
manifest-tool init -d arm.com --model-name example-app --force -q -
Export the absolute path to your
update_default_resources.cfile in the environment:export MBED_UPDATE_RESOURCE_FILE_IMPORT=/absolute/path/to/credentials/file
Continue with creating an update campaign.
Copying the Yocto image to the micro SD card
The main output of the Yocto build process above is an SD card image, located in rpi-build/tmp/deploy/images/raspberrypi3/mbed-cloud-client-example-image-raspberrypi3.rpi-sdimg. Copy this image directly to the SD card, using dd or a similar program. See, for example, this document for more information.
An example of how to build and copy an SD image to an SD card
Build the SD card image:
rpi-build/tmp/deploy/images/raspberrypi3/mbed-cloud-client-example-image-raspberrypi3.rpi-sdimg
Copy the image to the SD card:
- Check where the SD card is mounted to your PC. Connect an SD card to your PC, then use the command lsblk to locate the SD card. In this example, the SD card is mounted as /dev/sdc and has a size of 7.5GB:
~$ lsblk
NAME                 MAJ:MIN RM   SIZE RO TYPE MOUNTPOINT
sda                    8:0    0 238.5G  0 disk
├─sda1                 8:1    0   476M  0 part
└─sda2                 8:2    0   238G  0 part
  ├─vg00-swap (dm-0) 252:0    0   7.5G  0 lvm  [SWAP]
  └─vg00-root (dm-1) 252:1    0 230.6G  0 lvm  /
sdb                    8:16   0   1.8T  0 disk
├─sdb1                 8:17   0   128M  0 part
└─sdb2                 8:18   0   1.8T  0 part
sdc                    8:32   1   7.5G  0 disk
├─sdc1                 8:33   1    16M  0 part
└─sdc2                 8:34   1 492.3M  0 part
Use the dd utility to write the image to the SD card:
dd if=rpi-basic-image-raspberrypi3.rpi-sdimg of=/dev/sdc
Running the application
To run the Device Management Client example application, insert the micro SD card into the Rasbperry Pi 3, and connect it to power. The Yocto image boots into the Device Management Client example executable, which displays its messages on the system console. If you want to view these messages, connect the Raspberry Pi console UART to the PC using a serial to USB converter. This site has more information on how to make the Raspberry Pi console accessible from a PC.
When you have connected the serial to USB converter to the PC, open a terminal emulator (for example screen):
screen /dev/ttyUSB0 115200
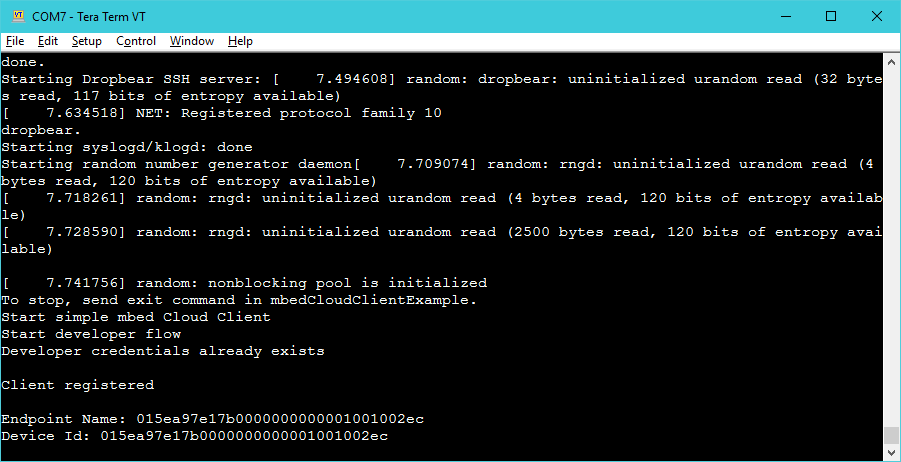
You can see the messages from the Linux kernel first, followed by the output of the example application:

Now that your device is connected to Device Management, you can read information from it and control it.