Setting up your Device Management account
You need a Device Management account to run the SDA demo. You can sign up for an account on the Device Management Portal for your region:
Note: You must be an account administrator to perform certain demo setup activities, such as creating users, groups and policies.
Create user groups
Create two user groups - device-admin and technicians.
To create your user groups:
- From the Device Management Portal side menu, select Access management > Groups.
- Click New group.
- Create a group called device-admin. Users in this group will be allowed all operations on the device.
- Create another group called technicians. Users in this group will only be allowed limited operations on the device.
Create policies and assign them to user groups
When the technician logs in to the Android app with their account credentials and requests an access token, Device Management checks the policies assigned to the technician. Device Management then returns an access token for the requested scope of operations and devices only if it finds a policy that matches the requested audience and scope of operations.
For this demo, create two policies - a read-data only policy and an allow all operations policy - and assign them to the technicians and device-admin groups, respectively.
To create the read-data only policy and assign it to the technicians group:
-
From the Device Management Portal side menu, select Access management > Access policies.
-
Click New access policy > Wizard.
-
Enter a name and description, and click Next.
Name example: SDA Demo - group="technicians" ep="<device endpoint name>".
Description example: Allows technicians operations with the scope of 'read-data' on a device with endpoint name<device endpoint name>. -
Set Token granted for to 1 day.
-
Under Scope, select the Selected functions option button.
A free-text field appears below. -
In the Selected functions field, type read-data, and click Next.
-
Under Identify devices by, select the Endpoint name option button.
-
In the free-text field below, enter your device's endpoint name, and click Next.
In developer mode, you can find the device endpoint name in the
mbed_cloud_dev_credentials.cfile you downloaded earlier. In production, use the device endpoint name given to the device during the factory provisioning process. For more information about the factory provisioning process, please see the Izuma Device Management Factory Provisioning documentation site. -
In the Search for group or user search box, search for and select the technicians group.
-
Click Next to review the policy.
-
Click Finish to save and activate the policy.
The Authentication required popup window is displayed. -
Type in your password, and click Enter.
The policy now appears in INACTIVE status in the list of policies for your account. -
To activate your policy:
- On the Access policies page, click the policy.
The Policy details page is displayed on the right side of the screen. - Click the icon next to the Inactive label at the top left corner of the pane.
A popup window prompts you to confirm policy activation. - Click Activate policy.
- On the Access policies page, click the policy.
To create the allow all operations policy (administrator) and assign it to the device-admin group:
-
From the Device Management Portal side menu, select Access management > Access policies.
-
Click New access policy > Wizard.
-
Enter a name and description, and click Next.
Name example: SDA Demo - group="device admin" ep="<device endpoint name>".
Description example: Allows the device-admin group all operations on a device with endpoint name<device endpoint name>. -
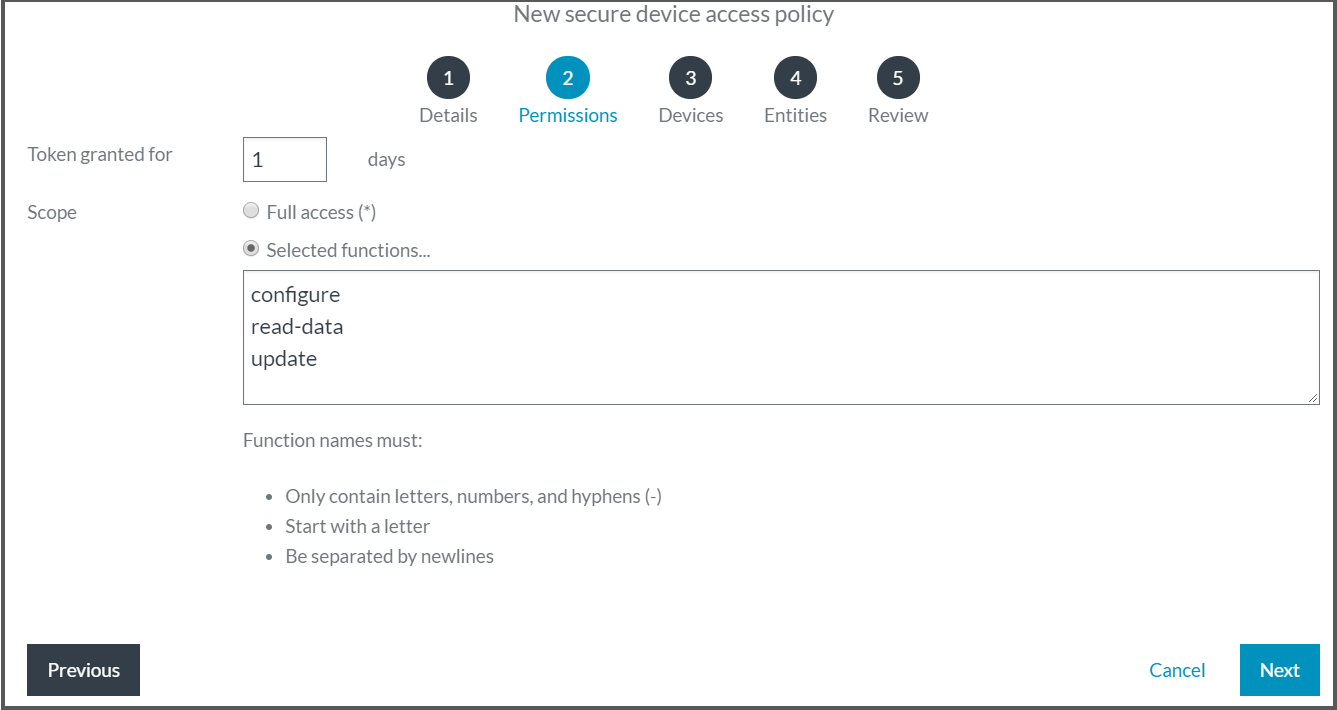
Set Token granted for to 1 day.
-
Under Scope, select the Selected functions option button.
A free-text field appears below. -
In the Selected functions field, type each of the following functions on a separate line:
- configure
- read-data
- update
-
Under Identify devices by, select the Endpoint name option button.
-
In the Values field, enter your device's endpoint name, and click Next.
In developer mode, you can find the device endpoint name in the
mbed_cloud_dev_credentials.cfile you downloaded earlier. In production, use the device endpoint name given to the device during the factory provisioning process. For more information about the factory provisioning process, please see the Izuma Device Management Factory Provisioning documentation site. -
In the Search for group or user search box, search for and select the device-admin group.
-
Click Next to review the policy.
-
Click Finish to save and activate the policy.
The Authentication required popup window is displayed. -
Type in your password, and click Enter.
The policy now appears in INACTIVE status in the list of policies for your account. -
To activate your policy:
- On the Access policies page, click the policy.
The Policy details page is displayed on the right side of the screen. - Click the icon next to the Inactive label at the top left corner of the pane.
A popup window prompts you to confirm policy activation. - Click Activate policy.
- On the Access policies page, click the policy.
Create users and assign them to user groups
Create two users - tech1 and tech2 - which represent two technicians.
The users must have real mailboxes (you can use your organization's emails) and must be invited to the account.
To create users:
- From the Device Management Portal side menu, select Access management > Users.
- Click Invite new user.
- Enter the email address of the person you are inviting, and assign the user to a group. Assign tech1 to the device-admin group.
- Click Invite, and enter your password to authenticate. The system sends an invitation to the email address you entered.
- The invitee must click the link provided in the email to enroll to the account and set a password for logging in to the demo application.
- Repeat the process, and add tech2 to the technicians group.