Using SDA in your IoT and Android device applications
As part of our SDA solution, we provide an SDA Android SDK and an SDA client library, which is part of Device Management Client. As the device manufacturer, you need to develop Android and IoT applications and that use these tools, and implement a transport layer over which the devices can communicate.
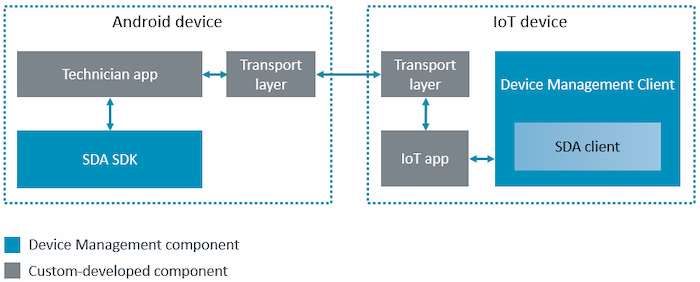
To demonstrate how you can develop an IoT solution using the SDA SDK and client, we provide a reference implementation, which includes an SDA technician application for an Android phone or tablet and a demo IoT application for the FRDM-K64F. In the reference implementation, the two devices connect over a serial interface. For more information, see the SDA demo tutorial.
To incorporate SDA into your IoT device solution, you must:
- Add SDA to your IoT device application.
- Provision the IoT device with a trust anchor.
- Develop a mobile application for the mobile device.
- Implement a transport layer between the IoT device and the mobile platform.
Add SDA to your IoT device application
Use the SDA Client API in your IoT device application to:
- Accept and parse messages from the mobile application.
- Extract actions from the message.
- Send confirmation to the mobile application about the outcome of the action (success or failure).
Currently, Device Management Client supports SDA on a K64F board.
To use SDA, compile your IoT device application with the MBED_CLOUD_CLIENT_ENABLE_SDA flag.
If you are using the secure-device-access-client-example application, see Setting up the client binaries.
Provision the IoT device with a trust anchor
To protect your device, you need to provide it with a public key that enables the device to verify the messages that it receives from the mobile application. This public key is known as the trust anchor because it stays on the IoT device throughout its life, allowing any authorized user to connect to it.
Note: If your factory uses Factory Configurator Utility (FCU), you must generate the trust anchor before you download FCU; otherwise, FCU does not know your trust anchor details and cannot issue it to devices.
To add a trust anchor:
-
In Device Management Portal:
- Select Device identity > Trust anchor from the side menu.
- Copy the PEM-format trust anchor.
-
In the factory, add the trust anchor to the information you inject into devices.
SDA fits into the standard provisioning process; all you need to do is add the trust anchor to the other information you inject to the device.Tip: See the Provisioning section for full instructions.
If you use FCU, FCU adds the trust anchor to the bundle.
If you do not use FCU, you must use factory configurator client (FCC) or key and configuration manager (KCM) to add the trust anchor. For full instructions, see the Izuma Device Management Factory Provisioning documentation site.
Device time and access token expiration
If you omit the time parameter from the bundle that you inject into your device during the factory process, or if the board is in developer mode, the device will not have a date or time set. As a result, if the device owner sets an expiration date on an access token, it will never expire because the device has no time or date settings.
Develop a mobile application for the mobile device
So that users (such as service technicians) can securely connect to the IoT device, you must create a mobile application using the SDA SDK. This application lets authorized users interact with the IoT device.
Your mobile application must be able to:
- Log the mobile device user into Device Management, to check that they are authorized to access the IoT device.
- Get an access token from the Device Management authorization service (AS) to provide to the IoT device, so that it knows that the user is authorized to access the device.
- Create and sign the operation bundle.
- Deliver the operation bundle to the IoT device.
Using the SDA SDK
Use the SDA SDK as a library in your mobile device Android application.
We provide an SDA demo app using this SDK as part of a reference implementation.
To create an application that implements Secure Device Access you must call the SecuredDeviceAccess class and use its methods as described below.
Getting an access token from Izuma Device Management
Use the following SDK method to get an access token from Device Management:
public static String getAccessToken(IAuthServer authServer, List<String> audience, String scope)
- Purpose: This method requests an access token in CBOR Web Token (CWT) format from the Device Management authorization service, providing specific parameters. The authorization service is implemented in Device Management and is abstracted and given to the method as an object whose initialization is the responsibility of the application.
- Parameters:
-
IAuthServer authServer- This object facilitates connection to the account in Device Management. See the implementing class,com.arm.mbed.dbauth.proxysdk.server.UserPasswordServer, which can be instantiated by the application using its Device Management account ID, user, and password. The login details are the details of the person who wants to use the mobile application to perform operations on the device; for example, a service technician. The Identity and Access Management service in Device Management should have a policy that authorizes the user to get a token to perform the requested operation.Example
... private String accountId; private String username; private String password; ... IAuthServer authServer = new UserPasswordServer( this.authServerBaseUrl, this.accountId, this.username, this.password ); ... -
List<String> audience- Each element in the list is a device ID or endpoint name that the user is authorized to access.Example
List audList = new ArrayList(); audList.add("ep:name with a space"); audList.add("id:1234567890abcdef1234567890abcdef"); ... -
String scope- A string, even if you provide a list of scopes (functions) delimited by spaces. For example:Example
String scope = "lights doors fw-upgrade";
...
-
- Response: String representation of the CWT access token, or
access denied.
Sending a message to the IoT device
Use the following SDK method to send a function to the IoT device:
public static OperationResponse sendMessage( String accessToken, String cmd, ParamElement[] params, IDevice device )
-
Purpose: This method:
- Connects to the device.
- Creates an operation bundle, signed with the private proof of possession (PoP), including:
- Access token.
- Operation bundle.
- Arguments.
- Nonce.
- Sends the operation bundle to the IoT device. The device is abstracted using the IDevice java interface, which you, as the application developer, must implement. We provide device abstraction examples for serial over USB in our repository. You need to create the relevant device abstraction for your application because the transport layer is not part of the SDK and varies from between implementations.
-
Parameters:
-
String accessToken- The base64 representation of the CWT token received from the SDA authorization service in the previous step. -
String cmd- The operation to perform on the device (originating from customer client application). The operation must match the scope requested in the access token. -
ParamElement[] params- Tuple list of optional command arguments. Two argument types are available:- String (STR).
- Int (INT).
Example
ParamElement[] cmdParams = new ParamElement[] { new ParamElement(OperationArgumentType.STR, "Wan"), new ParamElement(OperationArgumentType.INT, 130) }; -
IDevice device- This interface sends the bundle to the device. Implement the single interface method according to your device type and chosen transport protocol. We provide device abstraction examples for serial and TCP transport protocols in our repository. The interface is:IDevice package com.arm.mbed.dbauth.proxysdk; public interface IDevice { byte[] sendMessage(byte[] operationMsg); }
-
-
Response: The
OperationResponseobject shows the response from the IoT device and it includes the following attributes:- Success or error code. On the IoT device side, the value is defined in the sda_status.h file.
- The optional blob (of type byte[]) returned from the device.
The relevant classes are:
OperationResponse.ResponseBase.IResponse.OperationTypeEnum.
Working with the OperationResponse class
The OperationResponse class provides the following methods:
MessageTypeEnum getType()- The type of response.int getResponseStatus()- Status code number.byte[] getBlob()- Byte array representing optional binary data returned from the device.
Implement a transport layer between the IoT device and the mobile platform
The SDA solution we provide covers all crypto aspects of secure device access. You must implement a transport layer between the mobile application and the device, specific to your needs.
For the device
After you implement the transport layer in your device application, you must integrate the SDA client APIs into your device application following the instructions in the SDA client API documentation.
In our demo, we supply an example transport layer implementation using serial over USB.
For the Android application
In our demo, we supply an example transport layer implementation using a serial over USB library. Implement a transport layer in your own application similarly by inheriting from the AbstractDevice class.