Connecting to Device Management with a pre-provisioned ATECC608A secure element
This tutorial demonstrates how you can integrate an ATECC608A pre-provisioned secure element onto your board - as an alternative to provisioning devices with secure credentials in the factory - and connect to Izuma Device Management.
The secure element is a microprocessor chip pre-provisioned with keys and certificates that enable the DTLS handshake, which IoT devices and Device Management use to establish a secure connection.
Device Management Client and Mbed OS support the TrustFLEX-tier ATECC608A pre-provisioned secure element.
In production, you solder the secure element onto the board; however, Microchip offers evaluation kits, including the DM320118 development kit, which we use for this demo.
The tutorial explains how to connect to Izuma Device Management using a K64F device running Device Management Client example (mbed-cloud-client-example) with an ATECC608A secure element, including:
- Connecting the ATECC608A secure element to the K64F device.
- Configuring Device Management Client.
- Compiling and flashing Device Management Client.
- Connecting to Device Management.
- Updating the firmware.
Note: You can emulate the production flow of signing the pre-provisioned credentials on the secure element with your own CA using Trust Platform Design Suite. Device Management Client, Mbed OS and Factory Configurator Utility (FCU) support this flow, as described on the Izuma Device Management Factory Provisioning documentation site.
Prerequisites
- A K64F board with a network connection and an SD card attached.
- A DM320118 development kit.
- Four male-to-male jumper wires to connect K64F to the DM320118 development kit.
- Serial connection to your device with open terminal connection (baud rate 115200, 8N1).
- Arm Mbed CLI.
- An access key (with
Administratorsgroup privileges) for your Device Management account. - Updated DAPLink software (version 250 or later) for the K64F.
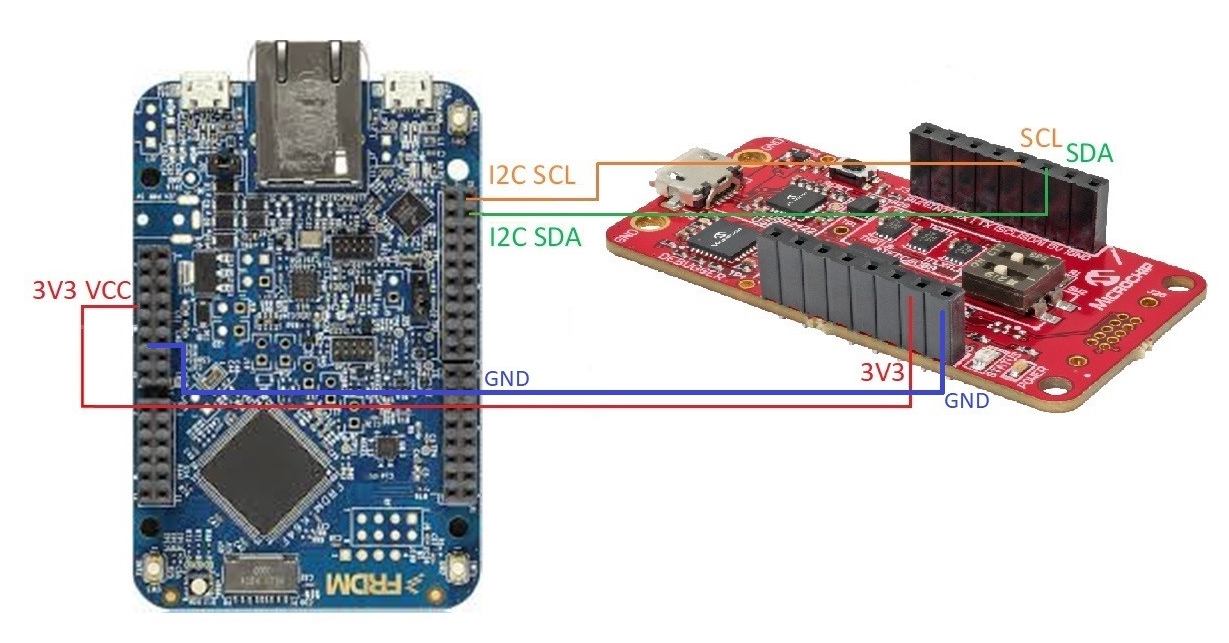
Connecting the ATECC608A secure element to the K64F
The DM320118 development kit includes the CryptoAuth Trust Platform development board.
An example of connecting the CryptoAuth Trust Platform development board to the K64F:
Configuring Device Management Client
-
Clone the embedded application's GitHub repository to your local computer and navigate to the new folder:
mbed import https://github.com/PelionIoT/mbed-cloud-client-example cd mbed-cloud-client-example -
Configure Mbed CLI to use the K64F:
mbed target k64f mbed toolchain GCC_ARM -
Download a developer certificate from Device Management Portal.
-
Copy the
mbed_cloud_dev_credentials.cfile to the root folder of the example application. -
Create update-related configuration and credentials using the
manifest-toolpython package:-
Upgrade to
manifest-toolversion 2.4.1 or higher:pip install --upgrade manifest-toolNote: If your host system Python version is 3.6, use manifest-tool version 2.4.1. Use version 2.5.0 (or newer) for a more up-to-date system. You can specify the version via:
pip install manifest-tool==2.4.1. -
Initialize the developer environment:
manifest-dev-tool init --access-key <Device Management access key>
-
-
Upload the Atmel CA certificate file to Device Management Portal to enable Device Management to trust your device. The Atmel CA certificate file, called
default-root-ca.crt, is located in thembed-cloud-client-example/source/platform/secure_element/se_atmel_credentialsfolder.
Compiling and flashing Device Management Client
-
Copy the
eth_v4_with_se_atmel.jsonfile to your root folder:cp mbed-cloud-client-example/configs-psa/eth_v4_with_se_atmel.json mbed-cloud-client-example/eth_v4_with_se_atmel.json -
Compile the application with the
eth_v4_with_se_atmel.jsonfile:mbed compile --app-config eth_v4_with_se_atmel.json -
Connect the K64F to your computer over USB. It's listed as a mass storage device.
-
Drag and drop
mbed-cloud-client-example.binto the device. This flashes the binary to the device. You should see the LED blink rapidly; wait for it to stop.
Connecting to Device Management
To check the device connection and obtain the device ID:
-
Press the Reset button to restart the device.
-
Obtain your device's Device ID either from device console logs or from Device Management Portal.
When the client connects successfully, the terminal shows:
Client registered
Endpoint Name: <Endpoint name>
Device ID: <Device ID>
To verify the connection with Device Management Portal:
-
Log in to Device Management Portal for your region:
-
Select Device directory from the menu on the left.
-
When your device is listed on the Devices page, it is connected and available.
Your device is now connected and ready for the firmware update. The Endpoint name in Device Management Portal is the DM320118 development kit serial number with the suffix
ATECC.
Updating the firmware
To update the firmware on your device:
manifest-dev-tool update \
    --payload-path mbed-cloud-client-example_update.bin \
    --device-id <Device ID>
    --wait-for-completion
During the update flow, the client tracing log shows:
Firmware download requested
Authorization granted
Downloading: [++++++++++++++++++++++++++++++++++++++++++++++++++] 100 %
Download completed
Firmware install requested
Authorization granted
After this, the device reboots automatically and registers to Device Management.